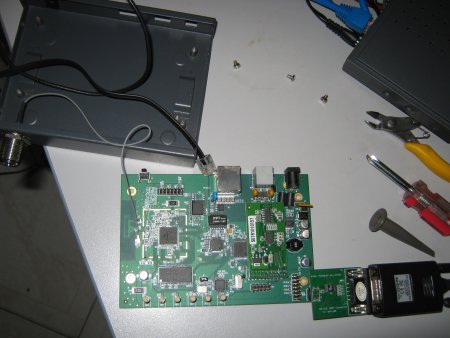
Paul Gardner-Stephen had one of his MP01s “brick up” when attempting a GUI-based reflash and was having problems recovering. So I offered to take a look at it for him.
Reflashing and recovery can be intimidating the first time around so I thought a short blog post might be useful to explain the steps I took to bring his potato back to life. I also hit a FXS driver/hardware problem. The steps I took show how to debug the FXS part of your potato.
Paul had made several attempts at reflashing and was concerned that he had zapped the boot loader. So to check the boot loader I took the optional (and usually unnecessary) step of connecting a RS232 daughter board to his MP01:

Due to the shape of the RS232 daughter board I had to remove the MP01 PCB from it’s metal box. The RS232 daughter boards are the same as the IP04 so I have many laying around, however they don’t ship as standard with Mesh Potatoes (let me know if you ever need one). The serial settings are 9600 baud, 8 data bits, 1 stop bit, no parity. Anyway I applied power and after a few seconds I saw the expected boot loader output:
+Ethernet eth0: MAC address 00:09:45:57:a8:89

IP: 192.168.1.124/255.255.255.0, Gateway: 192.168.1.1

Default server: 192.168.1.180
RedBoot(tm) bootstrap and debug environment [ROMRAM]
Non-certified release, version v1.3.0 - built 14:07:19, Jun 9 2009
Copyright (C) 2000, 2001, 2002, 2003, 2004 Red Hat, Inc.
Board: ap61
RAM: 0x80000000-0x81000000, [0x8003dd50-0x80fe1000] available
FLASH: 0xa8000000 - 0xa87e0000, 128 blocks of 0x00010000 bytes each.
== Executing boot script in 5.000 seconds - enter ^C to abort
RedBoot> fis load -l vmlinux.bin.l7
The last line is the boot loader loading the Linux kernel. However Linux wasn’t coming up, probably due to a dud image. So the next step was to try reflashing. My favourite reflash method is documented here on the Dili Village Telco Wiki. It has also been discussed at length on the Village Telco Google Group. There are actually several ways to flash a potato but this way is my favourite and has proven very simple and reliable in practice. It’s a very good idea to practice reflashing before you actually need it, as an exercise.
After reflashing Paul’s MP came right up. I telneted 192.168.1.20 and could see Asterisk running (using ps x) however the phone was dead. No evidence of power to the phone and no dial tone. I used “dmesg” to check what the FXS drivers where doing:
type=16550A

serial8250: ttyS0 at MMIO 0xb1100003 (irq = 37) is a 16550A

mask: 0xbd

CR: 0xbd

INT: 0xc6

mp: checking reg0 of 3215:

mp:  reg0.....: 0x0

mp:  part number: 0x0

mp:  revision...: 0x0

Registered mp char driver on major 34
Hmmm, these zeroes at “reg0” and “part number” don’t look good. This indicates the FXS driver can’t read registers on the FXS module. After poking around for a while I discovered the J1 jumper was not installed. This jumper connects the clock to the FXS module. I replaced this jumper and rebooted and the driver output looked better:
type=16550A

serial8250: ttyS0 at MMIO 0xb1100003 (irq = 37) is a 16550A

mask: 0xbd

CR: 0xbd

INT: 0xc6

mp: checking reg0 of 3215:

mp:  reg0.....: 0x3

mp:  part number: 0x0

mp:  revision...: 0x0

ProSLIC module is Si3215

Start manual calibration

Module 0: Installed -- AUTO FXS

Registered mp char driver on major 34
This is what you should see for a working FXS driver. The phone was now powered up, and dial tone was present. Hmmm, might be a good idea to print an obvious error message when the wrong register values are found!
To configure a MP01 I actually find it easier to telnet 192.168.1.20 and use vi to edit /etc/config/wireless and /etc/config/network, then run /etc/init.d/network/restart. But many people like the GUI, it’s your choice. I changed the Wifi Channel and BSSID to match my local mesh network and made a few test phones calls. Looks good, so I will send the MP01 back to Paul.
